This Markdown cheat sheet provides you with a quick, comprehensive reference to the basic syntax commonly used when writing in Inspire Writer.
Why do we need such a markdown syntax cheat sheet?
Well, you may have already known that every markdown editor has its markdown syntax modified, mostly just slight changes just so the users can have better writing experience.
That’s also true for Inspire. We don’t want you to get lost when you use Inspire for the first time, hence the following syntax cheat sheet.
To begin with, Inspire supports syntax highlighting. In other words, the format of your writing is decided by their markdown syntax. Here is an example:
Headings
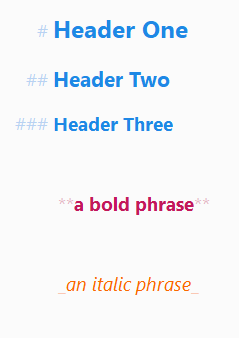
To make a heading, preface the phrase with hash marks # (or use Ctrl+H). The number of hash marks indicates the level of the heading. For example, when you need a level two heading, add two has marks.| Markdown | What it looks like when published / exported |
|---|---|
| # Heading level 1 | Heading level 1 |
| ## Heading level 2 | Heading level 2 |
| ### Heading level 3 | Heading level 3 |
| #### Heading level 4 | Heading level 4 |
| ##### Heading level 5 | Heading level 5 |
Emphasis: Bold and Italic
You can emphasize your text by making them bold and/or italic as you like.| Markdown | What it looks like when published / exported |
|---|---|
| I want the text to be **bold**. | I want the text to be bold. |
| I want the text to be **bold. | I want the text to be bold. |
| I want the text to be *italic*. | I want the text to be italic. |
| I want the text to be *italic. | I want the text to be italic. |
| I want the text to be marked as ||deleted. | I want the text to be marked as |
Block quotes
If you want to provide a motto, or want to imitate people's reply, a block quote would be the best option for you.| Markdown | What it looks like when published / exported |
|---|---|
| > This is a block quote. | This is a block quote. |
Lists
There are several kinds of order lists in Inspire that you can choose:| Markdown | What it looks like when published / exported |
|---|---|
| - This is an unordered list. | |
| + This is also an unordered list. | |
| • This is another unordered list. | |
| 1. This is an ordered list. 2. This is an ordered list. |
|
| - This is a nested layered list level 1. (Tab) + This is level 2 of a layered list. (Tab Tab) • This is level 3 of a layered list. |
|
| * Use 'Enter' to escape the bullet list if you want. |
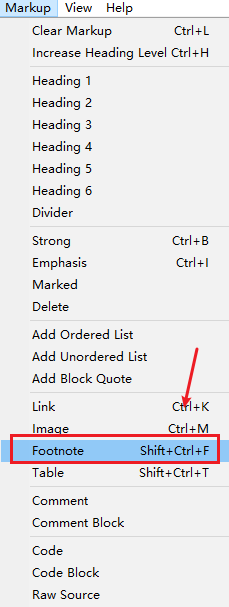
Links, footnotes and email addresses
Adding links, URLs, footnotes and email addresses is a no funny business, especially for those who are not exactly tech-savvy. You'll need to select the text, click the insert link button, copy and paste the link to the field, and hit update. The whole process drags you down, which is extremely painful when you're already falling behind your schedule!Worry no more, Inspire Writer is here to free you from all the clicking on your mouse - you can do just about anything without your fingers leaving your keyboard. Impressive, right?
Let's see how Inspire Writer can do it with markdown:
| Markdown | What it looks like when published / exported |
|---|---|
| I'm adding a link [here]. | I'm adding a link here . |
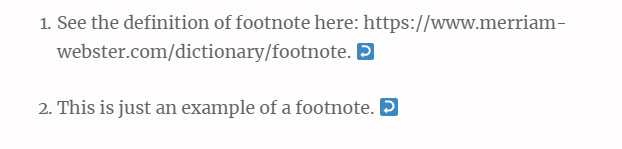
| I'm adding a footnote here (fn). | I'm adding a footnote here 1. |
| I'm adding an [email address] here. | I'm adding an email address here. |
Image
Just like links and footnotes, it's hard to juggle with adding images without spending tons of time on it. With Inspire Writer, this is no longer the case.| Markdown | What it looks like when published / exported |
|---|---|
| I want to add an image here (img). | I want to add an image here . . |
Tables
Adding tables with markdown syntax only can be quite tricky - you need to add the dashes and outer pipes (|) by yourself, just thinking about it is giving me a mild headache. Inspire Writer deals with tables different. Let's find out.| Markdown | What it looks like when published / exported |
|---|---|
| I want to add a table here (table). | 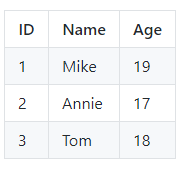 |
That’s about it all!
Feel free to let us know what you think we should add to this cheatsheet by leaving a comment below. 🙂