Clouds, they keep our data safe from leaking or being lost.
Cloud sync in Inspire allows you to seamlessly sync and share files among multiple PCs with public cloud services such as Dropbox, Google Drive, OneDrive and many more on Inspire.
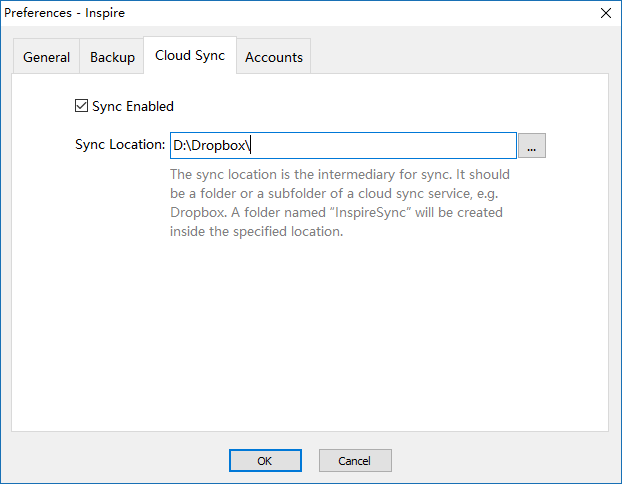
Just specify the folder where your cloud sync service locates in File > Preferences… > Cloud Sync:
Enable cloud sync on Inspire
Repeat the step on your other PCs.
Ta-da! Your copies of Inspire should then sync with one another.
The world collapses in front of you when you lose your two-hours’ writing to not hit the save button in time… And inevitably, your writing efficiency takes the brunt.
What’s with the save setting? Can we not have autosave at all?
Yes, of course, you can have autosave. And this is what Inspire does.
It automatically saves all your writing, so there’s no save button. Auto-save plus cloud sync, you’ll never have to worry about losing any of your writing.
To restore your content:
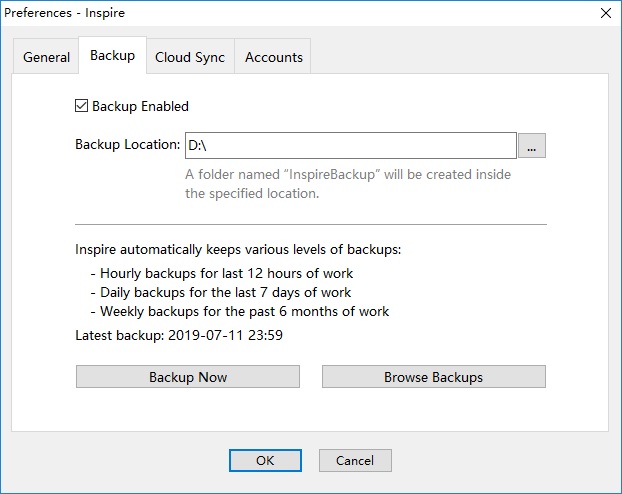
Choose a Backup Location
Go to File › Preferences… › Backup.
Select the location where you want your backups to be stored.
Click OK.
Restore from a Backup
Go to File › Browse Backups….
Double-click the backup file you want to restore.
Follow the on-screen instructions to restore your files.
Inspire looks clean and simple, even to the point where you may doubt if it has enough features to support your distraction-free writing experience. Well, don’t let that fool you: Inspire looks that way, but it sure is equipped with features and tools that work to build you a comfortable writing environment.
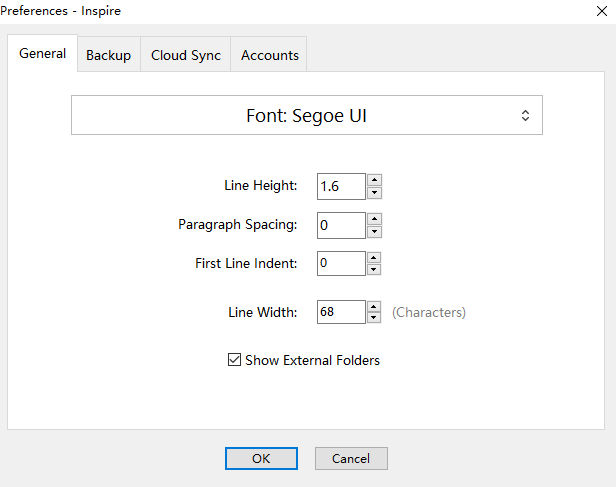
If you want to fine-tune the writing experience within the editor by choosing your favorite font, the spacing and line-height, and width that appeals to you the most, you can do so by changing the default settings in Preference.
To do so, click File, then preference…. Then change the metrics here as per your needs.
Change your editor preference in settings
Feel free to try these numbers out till you find the perfect match for you.
A goal helps you keep track of your writing progress. For example, you can set a goal of 5,000 words for your work today. Nothing trumps the excitement of seeing yourself reaching a goal!
The goal in Inspire measures the following metrics:
characters
character (no spaces)
words
To attach a goal to a sheet, click the paperclip icon () on the top left of the editor, you invoke the attachments window. Click Goal, then set the goal for your sheet:
Add a goal to the Inspire sheet
Or you can invoke the goal window by pressing F5, and then set your goal as per your own needs.
A note to the sheet could be a way of reminding yourself what the sheet is mostly about.
If you’re writing a novel or a script in Inspire, it’d be faster for you to locate the sheets you want by going through the notes. You could add a note with text like “It’s the POV of the antagonist.”, “1st twist”, etc.
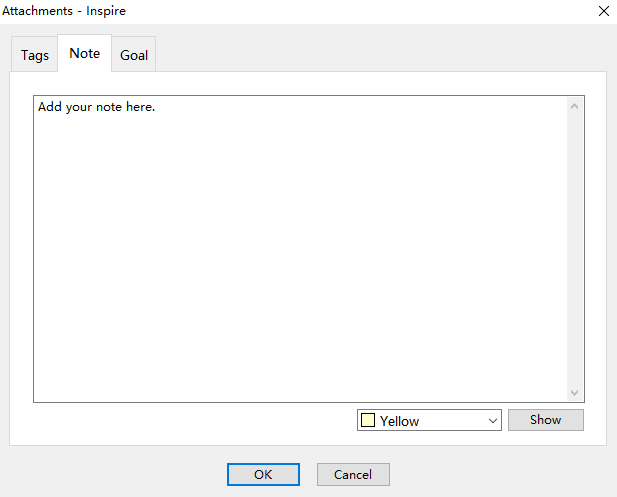
To add a note to your sheet, click the paperclip icon () on the top left of the editor, you invoke the attachments window. Click Note:
Add a note to your sheet.
Add your note in the text field accordingly. If you want it to show on your sheet, click Show. Then click OK to save and exit.
Or you can let the note shown on the sheet by pressing F4, and then add your note there.
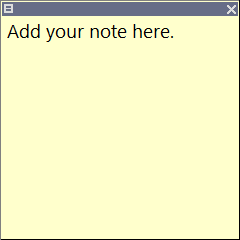
How your note will look like
You’ll see the note pasted on your sheet. You can drag and drop it to where you find most comfortable.
If you have a thousand sheets in Inspire, it must be hard to tell which are drafts ready for review and which are ready for publishing. Tags are the little helpers in this case.
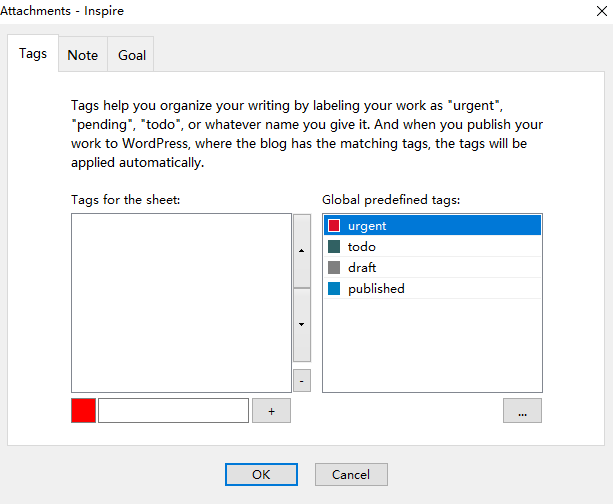
By clicking the paperclip icon () on the top left of the editor, or by using the shortcut keys Ctrl + 4, you invoke the attachments window:
Add a tag to your sheet.
Feel free to add any tags for your sheet here for your own reference:
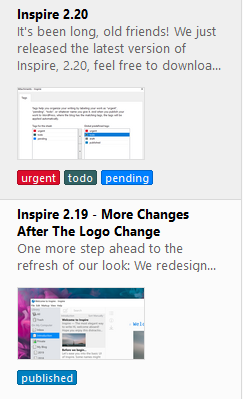
How your sheet list looks like with the tags.
Can Inspire share the same tags with my WordPress website?
Sure, it can.
Let’s say that you have a tag in both your WordPress site and Inspire called ‘Markdown writing’. Then you add the ‘Markdown writing’ tag to the Inspire sheet, and decide to publish it to your site. You’ll then see the tag ‘Markdown writing’ added to the post automatically. No need for you to repeat the tag-adding process again.
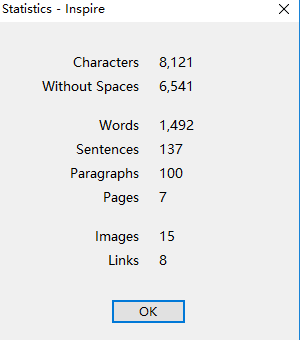
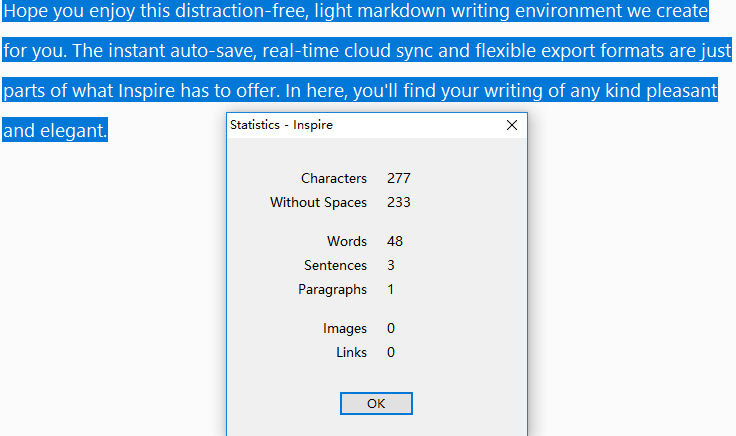
If you write longer content with Inspire, you must want to know how far you’ve gotten. Statics is the tool to keep track of where you are at in Inspire. And it’s unbelievably easy to use.
Statistics metrics of a sheet
By clicking the statistics icon () on the top left corner of the editor, you open the Statistics window that shows you all sorts of useful information about your current sheet:
Statistics of a sheet.
How long is the selected text?
You can also check the length of the selected text only. Simply by selecting the text section, and click the statistics button on the side.
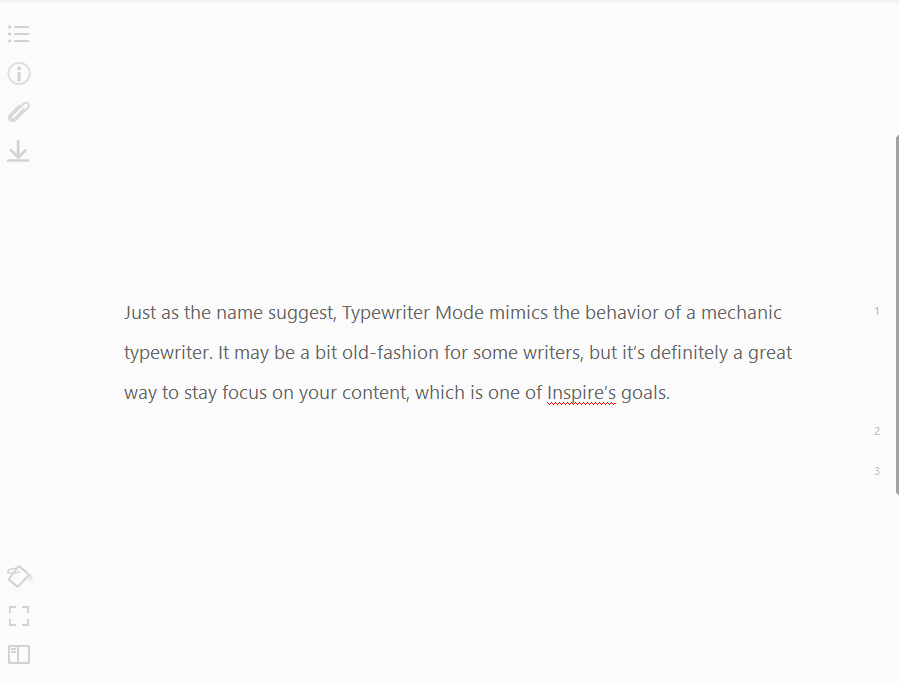
Just as the name suggests, Typewriter Mode mimics the behavior of a mechanical typewriter. It may be a bit old-fashion for some writers, but it’s definitely a great way to stay focus on your content, which is one of Inspire’s goals.
When typing on Inspire Typewriter Mode, you will always see your current line staying in the middle of the page, while the text you just typed will be pushed upwards, adding one more touch to the distraction-free writing environment that we’re working hard to build. Of course, you can scroll to wherever you want the text to be and keep typing.
To enable Typewriter Mode, click View, then Typewriter Mode. You’ll then see your current line stays where it is, ideally in the middle of the page, but it can also be wherever you want it to be.
When you open Inspire, you can see 3 columns from left to right: Library & Groups, Sheet list, and the Editor.
3 columns from left to right: Library & Groups, Sheet list, and the Editor.
Being the first column on the left, Library & Groups is like the manager of all your work written in Inspire: it’s on top of everything and it keeps things all under control.
How so? Let’s move on, and you’ll see how Inspire is the ideal tool for you to write in a distraction-free environment.
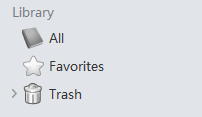
Library: holds everything you write
All your work is in the Library, including the deleted ones. You can see it as the Windows folder that has access to all your text.
That said, if you erase files manually, you won’t see them here.
In the Library section, you can see 3 groups, All, Favorites, and Trash.
All your current work is in the All group.
When you add your sheets to favorites, you’ll see them in the Favorites group. This comes in handy when you want to have quick access to some sheets. If you don’t see the Favorites group in your library, it’s because you haven’t favored your sheets yet.
Your deleted sheets and groups will go to the Trash folder. You can restore or erase files here if you like. But please be note that the erased files and groups will be removed from your computer completely and it cannot be undone.
On My Computer: categorize your work into groups, subgroups, etc.
In the On My Computer section, you’ll see 2 universal groups: Inbox and Introduction.
Inbox and Introduction groups in the Library.
Inbox holds all the .IS files you receive and open with Inspire.
Introduction is where you find basic information about markdown and how to use Inspire.
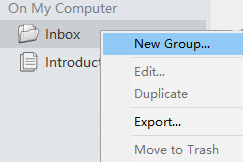
The other folders. As per your own needs, you can add as many groups on your computer as you like. Simply by right-clicking Inbox and click New Group….
Create a new group.
When you select a group, you’ll get an overview of all its subgroups and sheets.
External Folders: edit .md files from other platforms
External folders allow you to see and edit your .md files from other platforms (such as Mac). In this way, you can transfer your documents to Inspire for further editing.
When you open Inspire, you can see 3 columns from left to right: Library & Groups, Sheet list, and the Editor.
Sheet list is the column in the middle. It contains a bunch of “classic documents”, except that they don’t require a “title” or a “filename” or anything as such.
Sheet list in Inspire.
In other words, you don’t need to scratch your head to come up with a title before you write. This is how Inspire fastens your writing workflow. On the improving writing efficiency front, every step counts.
Here are what you can do in the sheet list to improve your writing efficiency:
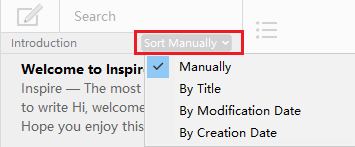
Change sort order: for better sheet organization
Here, you can change the sort order of your sheets in a group.
To do so, just select the group you want to sort, and hover your mouse over to the top-right corner of the group, and select one of the options you see here:
Change your sheets sort order.
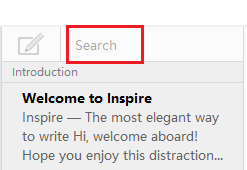
Searching for keywords: locate your sheet faster
Search for keywords
You can also filter your sheets by typing in the keyword in the Search field, so you’ll only see sheets with the searched keyword listed.
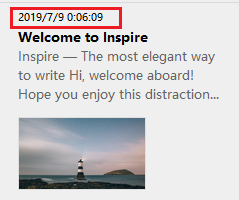
Display dates in the sheet list: keep track of the last update
In Inspire, you can show the dates of a sheet in the sheet list. To do so, you can go to View > Sheet Preview, then make sure that you’ve ticked Dates .
View the updated dates of your sheets.
By default, you can see the updated date above each sheet:
An example of the updated date on a sheet.
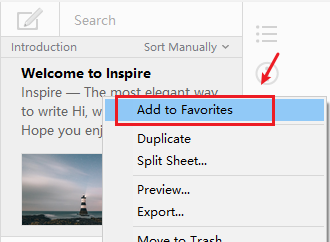
Add to Favorites: direct access to your favored sheets
Byadding your sheets to favorites, you’ll see them in the Favorites group in the Library, so you don’t have to spend your time searching for them in the group hierarchy. Such direct access leads to a smoother workflow.
Add a sheet to your Favorite group.
Duplicate: copy your current sheet
Just as the name entails, by duplicating the selected sheet, you’ll get an identical copied sheet in the same group. So you can move it around to other groups if you need, without having to manually copy and paste the entire sheet to a new one.
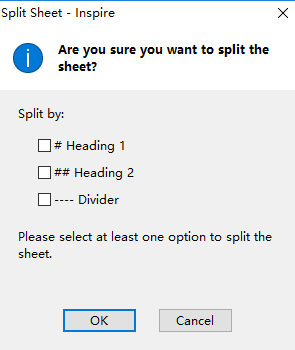
Split Sheet…: split a sheet by heading and/or divider
If you want to split your long document into shorter, handy chunks, like when you’re working on large projects such as novels, it’s done almost immediately on Inspire.
To split your sheet, you can right-click the sheet and click Split Sheet…. Then choose how you like the sheet to be divided, and click OK.
Split your work with long content by headings and/or divider
There, you now have a group of sheets stored in a new group.
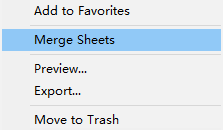
Merge sheets: join multiple sheets into one
Inspire aims to let you write whole books, and you’ll probably need more than one single sheet of content for these. So, merging multiple sheets into a master one for later use is of great help. Here is how you can do it:
Press the Ctrl key and select the sheets you want to merge. Right-click the sheets highlighted and click Merge Sheets.
Merge multiple sheets into one
There, you have your master sheet created.
Preview…: see how your work will look like
Right-click your sheet and select Preview…, you’ll see how your sheet will look like when it’s published to the website.
You can also Preview multiple selected sheets to see how are the sheets doing when merged.
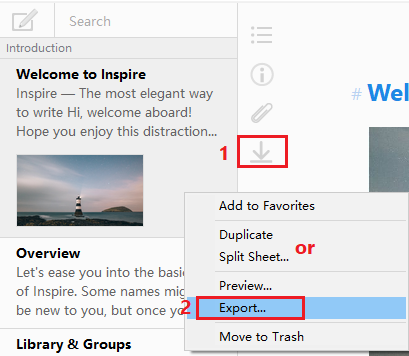
Export…: export to a host of standard formats, publish to WordPress or Medium
When you finish your writing, how do you want the world to see it? Inspire allows you to export your work to numerous standard formats (Text, HTML, DOCX, PDF, etc.). You can also publish it directly from within the app to your WordPress website or a Medium account.
You can either 1) click the export button on the editor, or 2) right-click the sheet and select Export… to invoke the export option.
How to export your work from Inspire
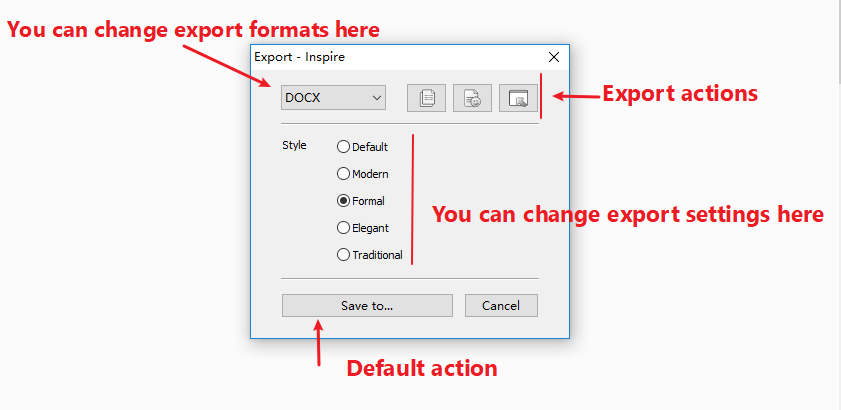
This is what the export panel looks like
What you can do in the export panel
From left to right, up to down:
You can choose what format you want your work to be export as,Text, HTML, PDF, DOCX, or InspireSheet. You can also publish your work to WordPress or Medium as well.
Copy to clipboard
Preview… allows you to see what your exported sheet will look like
Open in… lets you open your sheet in available applications
Save to… opens and saves your sheet to your local folder
Publish… allows you to publish to WordPress and Medium
Cancel if you have second thought about exporting
Export multiple sheets
You can also export multiple sheets all at once.
When you selected the sheets, all of them will be “stitched together”, like a large chunk of content. You then can decide what format you want the merged sheet to be in, just like a regular sheet.
Move to Trash: move unwanted sheets from the sheet list
When you move your sheets to the Trash group, they’ll stay there, until you erase them manually. But please be aware that manual erased sheets can’t be retrieved, so please do so with extra discreet.