Markdown Footnote: How It Spices Up Your Writing Workflow

As writing genres become more fluid these days, footnotes are no longer exclusive to academic writing. You can include them in your work of any kind if you need, be it a short novel, a long blog post, a short story, or even a poem!

For you, this means more authenticity for your work, more value-added information and fewer distractions for your audience. What more could you ask for?

In other words, it’s wise of you to add footnotes to your writing and have them spiced up your work. Keep on reading and see how you can add footnotes easily in Inspire Writer.

First off, what are footnotes?

Footnotes [1] can be anything: interesting comments, relevant sources, additional information, etc. (You can click the superscript number with the link to jump to the footnote at the bottom of this page to see for yourself what a footnote is. )

To some extent, you can add what seems too distracting for your audience, but could provide more information as a footnote.

We usually see footnotes in books as references or comments made by editors or translators at the bottom of a page. Or we can also find them at the end of a page of a rather long blog post, or a piece of academic writing.

Do I need to add footnotes in my work?

You don’t have to include footnotes to your work, if you don’t want to. I just suggest that you add them when you’re writing something like a novel, a short story, etc.: They’d be interesting reading materials for your readers.

To sum up, footnotes can do the following for you:

  • Provide explanatory notes to your readers without interrupting their reading flow;
  • Avoid distracting your reader from your main text;
  • Avoid cluttering your page with trivial but interesting information;
  • Add more authority to your work;
  • Provide value-added information to your readers;
  • And more.

How to add markdown footnotes in Inspire

To add a footnote in Inspire (download Inspire from here if you haven’t already), here is how:

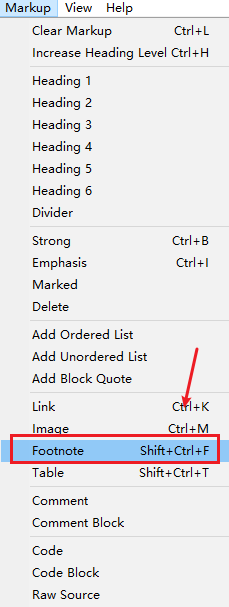
1) Place your mouse cursor to the text where you want to add the footnote[2] to. Click Markup > Footnote. Or use the shortcut keys Shift + Ctrl + F.

To add a footnote in Inspire the markdown writing app for distraction free writing of all kinds
To add a footnote, use the shortcut keys Shift + Ctrl + T, or click Markup > Footnote.

2) There you go, you’ll see the footnote icon on the right corner of the footnote, and its content at the end of your page like this:

NOTE: The style of the footnotes depends on your website design. Therefore it can look very different from what’s shown here.

Over to you…

What do you think about adding footnotes to your work? Have you tried to add them to your work in Inspire before? What do you usually include in your footnotes? Feel free to share with us your writing experience, and your story could provide help for some.


  1. See the definition of footnote here: https://www.merriam-webster.com/dictionary/footnote.
  2. This is just an example of a footnote.

Publish to WordPress and/or Medium From Within Inspire

You can publish your work written to WordPress or Medium directly from within Inspire Writer the app.

Here is how you do it:

Publish to WordPress from Inspire

To do so:

1) You need to add your WordPress account via File › Preferences…Accounts. Click the + button and Custom WordPress….

Add WordPress account to Inspire the distraction-free writing app
Add WordPress account to Inspire

2) Add your WordPress account information. Click Log In.

Enter your WordPress account credentials in Inspire the distraction-free writing app.
Enter your WordPress account credentials in Inspire.

3) You can also publish your post with a featured image straight from Inspire.

Add a featured image to your post directly in Inspire.

Publish to Medium

To publish your work written in Inspire to Medium:

1) You first need the token from Medium by emailing to <yourfriends@medium.com>.

Medium will then grant access to the Settings page of your Medium account.

2) When your token generation setting is turned on by Medium, go to your setting page, look for the Integration tokens section, and enter the description for Inspire. A token for Inspire will then be generated.

3) When you have the key, go to File › Preferences… > Accounts, then click the +button and Medium….

Connect Medium and Inspire the distraction-free writing app
Connect Medium and Inspire

4) Copy and paste your Medium token. Click Log In.

Provide Medium account integration token to Inspire
Provide Medium account integration token

There you go, easy as a cake.

Over to you…

How do you feel about the process? Do you want to know more about how to publish your work to WordPress and Medium directly from Inspire? Feel free to let me know your thoughts by leaving your comments below, and I’ll respond asap.

Automatic backup in Inspire: so you don’t need to worry about losing writing

The world collapses in front of you when you lose your two-hours’ writing to not hit the save button in time… And inevitably, your writing efficiency takes the brunt.

What’s with the save setting? Can we not have autosave at all?

Yes, of course, you can have autosave. And this is what Inspire does.

It automatically saves all your writing, so there’s no save button. Auto-save plus cloud sync, you’ll never have to worry about losing any of your writing.

To restore your content:

Choose a Backup Location

  1. Go to File › Preferences… › Backup.
  2. Select the location where you want your backups to be stored.
  3. Click OK.

Restore from a Backup

  1. Go to File › Browse Backups….
  2. Double-click the backup file you want to restore.
  3. Follow the on-screen instructions to restore your files.

Change text font, spacing, line height, and the width of the writing area in Inspire

Inspire looks clean and simple, even to the point where you may doubt if it has enough features to support your distraction-free writing experience. Well, don’t let that fool you: Inspire looks that way, but it sure is equipped with features and tools that work to build you a comfortable writing environment.

If you want to fine-tune the writing experience within the editor by choosing your favorite font, the spacing and line-height, and width that appeals to you the most, you can do so by changing the default settings in Preference.

To do so, click File, then preference…. Then change the metrics here as per your needs.

Change your editor preference in settings

Feel free to try these numbers out till you find the perfect match for you.

Tags in Inspire: tell your sheet status with just a glance

If you have a thousand sheets in Inspire, it must be hard to tell which are drafts ready for review and which are ready for publishing. Tags are the little helpers in this case.

By clicking the paperclip icon () on the top left of the editor, or by using the shortcut keys Ctrl + 4, you invoke the attachments window:

Add tags to your Inspire sheets.
Add a tag to your sheet.

Feel free to add any tags for your sheet here for your own reference:

How your sheet list looks like with the tags in Inspire
How your sheet list looks like with the tags.

Can Inspire share the same tags with my WordPress website?

Sure, it can.

Let’s say that you have a tag in both your WordPress site and Inspire called ‘Markdown writing’. Then you add the ‘Markdown writing’ tag to the Inspire sheet, and decide to publish it to your site. You’ll then see the tag ‘Markdown writing’ added to the post automatically. No need for you to repeat the tag-adding process again.

Sheet list: organize your projects and texts

When you open Inspire, you can see 3 columns from left to right: Library & Groups, Sheet list, and the Editor.

Sheet list is the column in the middle. It contains a bunch of “classic documents”, except that they don’t require a “title” or a “filename” or anything as such.

Sheet list in Inspire.

In other words, you don’t need to scratch your head to come up with a title before you write. This is how Inspire fastens your writing workflow. On the improving writing efficiency front, every step counts.

Here are what you can do in the sheet list to improve your writing efficiency:

Change sort order: for better sheet organization

Here, you can change the sort order of your sheets in a group.

To do so, just select the group you want to sort, and hover your mouse over to the top-right corner of the group, and select one of the options you see here:

Change your sheets sort order in Inspire.
Change your sheets sort order.

Searching for keywords: locate your sheet faster

Search for keyword
Search for keywords

You can also filter your sheets by typing in the keyword in the Search field, so you’ll only see sheets with the searched keyword listed.

Display dates in the sheet list: keep track of the last update

In Inspire, you can show the dates of a sheet in the sheet list. To do so, you can go to View > Sheet Preview, then make sure that you’ve ticked Dates .

View the updated dates of your sheets in Inspire.
View the updated dates of your sheets.

By default, you can see the updated date above each sheet:

An example of the updated date on a sheet.

Add to Favorites: direct access to your favored sheets

By adding your sheets to favorites, you’ll see them in the Favorites group in the Library, so you don’t have to spend your time searching for them in the group hierarchy. Such direct access leads to a smoother workflow.

Add a sheet to your Favorite group.

Duplicate: copy your current sheet

Just as the name entails, by duplicating the selected sheet, you’ll get an identical copied sheet in the same group. So you can move it around to other groups if you need, without having to manually copy and paste the entire sheet to a new one.

Split Sheet…: split a sheet by heading and/or divider

If you want to split your long document into shorter, handy chunks, like when you’re working on large projects such as novels, it’s done almost immediately on Inspire.

To split your sheet, you can right-click the sheet and click Split Sheet…. Then choose how you like the sheet to be divided, and click OK.

Split your work with long content by headings and/or divider

There, you now have a group of sheets stored in a new group.

Merge sheets: join multiple sheets into one

Inspire aims to let you write whole books, and you’ll probably need more than one single sheet of content for these. So, merging multiple sheets into a master one for later use is of great help. Here is how you can do it:

Press the Ctrl key and select the sheets you want to merge. Right-click the sheets highlighted and click Merge Sheets.

Merge multiple sheets into one

There, you have your master sheet created.

Preview…: see how your work will look like

Right-click your sheet and select Preview…, you’ll see how your sheet will look like when it’s published to the website.

You can also Preview multiple selected sheets to see how are the sheets doing when merged.

Export…: export to a host of standard formats, publish to WordPress or Medium

When you finish your writing, how do you want the world to see it? Inspire allows you to export your work to numerous standard formats (Text, HTML, DOCX, PDF, etc.). You can also publish it directly from within the app to your WordPress website or a Medium account.

You can either 1) click the export button on the editor, or 2) right-click the sheet and select Export… to invoke the export option.

How to export your work from Inspire

This is what the export panel looks like

From left to right are what you can do in the export panel: you can change export formats, you can directly export, or see draft, you can change the export settings
What you can do in the export panel

From left to right, up to down:

  • You can choose what format you want your work to be export as,Text, HTML, PDF, DOCX, or InspireSheet. You can also publish your work to WordPress or Medium as well.
  • Copy to clipboard
  • Preview… allows you to see what your exported sheet will look like
  • Open in… lets you open your sheet in available applications
  • Save to… opens and saves your sheet to your local folder
  • Publish… allows you to publish to WordPress and Medium
  • Cancel if you have second thought about exporting

Export multiple sheets

You can also export multiple sheets all at once.

When you selected the sheets, all of them will be “stitched together”, like a large chunk of content. You then can decide what format you want the merged sheet to be in, just like a regular sheet.

Move to Trash: move unwanted sheets from the sheet list

When you move your sheets to the Trash group, they’ll stay there, until you erase them manually. But please be aware that manual erased sheets can’t be retrieved, so please do so with extra discreet.

Other features for the sheet list

  • Add a new sheet: shortcut keys Ctrl + N
  • Previous sheet: shortcut keys Ctrl + Up
  • Next sheet: shortcut keys Ctrl + Down